When you go to the store to purchase some mung beans, you didn’t expect it to turn into this delicious vegetable. The shortest time to have delicious vegetable only 5 to 7 days. Asian family has use these sprouts in most of their pho soup, chop suey, chow mein, and other stir-fry dishes. What is this bean that sprouts only a week and makes your delicious food awesome?
Over the holidays my husband and I went to visit his friend Steve’s and family home. He was making his sushi bomb and invited us over. Sushi bomb is made with whatever you want in the center. For his, it was spam and cream cheese. Cover with a thin layer of seaweed wrap then added sushi rice, rolled into a ball. These are fist size ball. Fried until the rice is golden brown.
While his sushi bomb exploded in our mouths. We washed it down with some 40oz… will make that 42oz malt liquor. Back in the day malt. You don’t see that everyday.
The Surprise
I guess after the 42 and some he pulled out a bowl from under his table. I thought he was giving us more of his failed experiments. To my surprise he showed us how he was growing mung bean. I guess he was feeling happy after the malt liquor. Let’s make that clear, his mom started the process and had him watched over for a couple more days before it’s ready.
The Process of Growing Mung Beans
Materials you need:
-
- salad bowl depending on how many sprouts you want
- colander
- cereal bowls X2
- mung beans
- paper towels I recommend brawny because it keeps the towel damp better
- 1 gallon zip lock bag fill with water about 1/4 way. Don’t fill it up.
Soak your mung beans overnight up to 12hrs. Mung beans and lentils are smaller so they can be soak for eight hours. Bigger beans needs to be soak longer, 12hrs. The mung beans will soak up the water and starts to germinate quickly. There’re other beans you can use like alfalfa, lentils, chickpeas, and adzuki beans. I prefer mung beans because I use them most often.
You’ll need to put one cereal bowl face down at the bottom of the salad bowl. Next is the Colander, where you are going to put the mung beans in for sprouting. In the colander, wet two paper towels to layer the bottom. Spread your soaked mung beans that has been soaking overnight onto the paper towels. Wet another two paper towels and lay that on top of the soaked mung beans.
With the other cereal bowl face down as well on top of the covered mung beans. Final step is to use the 1/4 fill gallon zip block bag as weight. You’re wondering why the weight? The weight is for resistance. Something to help them grow thick and crispy. Now that everything is done, store it in a dark place like a closet or pantry for a couple of days.
They grow pretty fast so don’t forget about them. Check to see if the paper towels are still damp. Keep up the dampness of the paper towels and you’ll have thick juicy bean sprouts in no time.
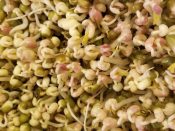
This picture is only four days old. Looks so beautiful. In a day or two it’s ready to eat! Sweet!
Other methods
There are other methods of growing mung bean sprouts using a mason jar. The reason I don’t like using the jar is that I can’t use weight on them to help them grow bigger and thicker. That’s the purpose of the other cereal bowl.
Any size colander will do, as long as you have the room to store the mung beans for sprouting. It also depends on how much bean sprouts you want.
The salad spinner I got from Ikea works to. The colander that is inside can easily remove in and out without disturbing the sprouts. The paper towel can be easily change and replace as well. You can get your
Conclusion
Growing mung beans into delicious bean sprouts that you can put in your pho soup, crisp and crunchy. Cook them in your stir-fry. Top it off on any dish. It’s healthy and organic. However, you decided to grow mung beans in a jar do not use the lid. It should be lid free and cover with cheese cloth.
You would need to rinse and repeat every day to prevent smells and rot. The hard husk will be loose and wash away after you rinse them. Good luck with your experiment.
Thank you for stopping by. For whatever process you take, try to have fun. Experiment until you get it right. Thanks for reading this far. I appreciate you for stopping by. However, you have any questions or comments please leave them on my comment section and I will get to you as soon as I can.
Let’s learn from each other.